Showing posts with label Elias Chatzoudis. Show all posts
Showing posts with label Elias Chatzoudis. Show all posts
Sunday, April 10, 2022


These two tags were made using one of Wicked Princess Scraps
Image Based Kits she has at CDO. This kit is called Marika-67-2

With 20 elements, 6 papers, 2 frames, and 1 word art,
There are many possibilities!
You can grab the kit at CDO!
Thursday, July 24, 2014
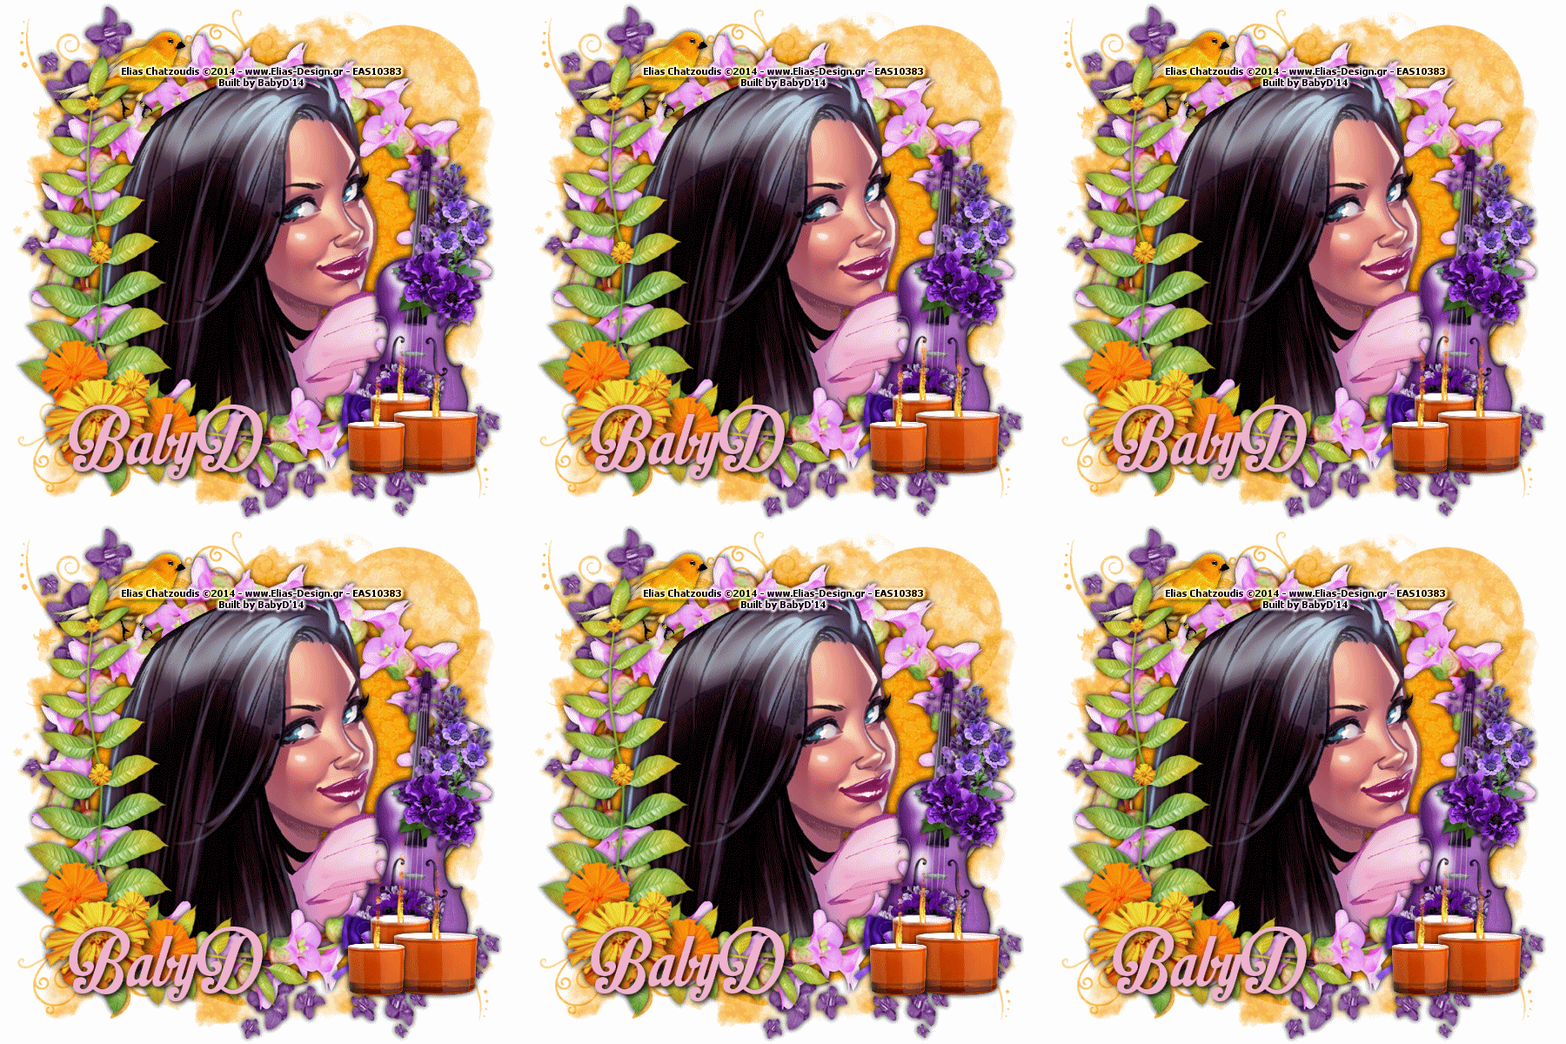

This tut was made using PSPx4 and Animation shop.
And knowledge of PSPx4 and Animation Shop.
Supplies needed
Tube of choice. I used one by Elias Chatzoudis.
You need a license to use his work. You can get it
and hhis work here at Elias Art Shop.
PTU kit I am Devine by Wicked Princess Scraps.
Can get it at The PSP Project.
Animation used Candle Flames by Scrappy Bit of Fun.
Mask of choice. I used DBV Mask 15 by Designs b Vaybs.
Font of choice. I used Motion Picture.
Go ahead and open list of Things here used and go ahead and resize them
by the percentage by each item. If there is no number no need to resize.
DBV Mask 15
WP_IAD_PP7
WP_IAD_FLOWER1 - 90%
WP_IAD_FRAME1 - 75%
Tube Close up Resized to fit
WP_IAD_VIOLIN - 65%
WP_IAD_BIRD - 25%
WP_IAD_FLOWER4 - 75%
WP_IAD_CANDLES
When you see ** look at tag to see placement for Elements.
Sometimes it is hard to say just how to place it.
Drop shadows added are 0.0.100.4 unless otherwise stated.
It is always good to check for overhang of shadow on edges of tag.
I have made a tag or to and not check and when I got done
I would post it and see the over hang on the sides and think MAN!! lol
Remember to save often.
Start off with New image 600 x 600. Flood fill white.
Copy and paste WP_IAD_PP7 as new layer. Layers, New Mask layer.
Find the mask in the list Click ok. Merge group
Copy and paste WP_IAD_FLOWER1 as new layer. Images Flip Horizontal.
Add drop Shadow.
Copy and paste WP_IAD_FRAME1 as new layer. Add drop shadow.
Copy and paste. tube as new layer. Move behind frame layer.
Add drop shadow. On tube layer selections all float defloat.
On frame layer erase parts of frame so it looks like the tube
is coming out of the frame. Selections none. Erase any tube
overhang.
Copy and paste WP_IAD_VIOLIN as new layer. Move to bottom right
of tag.** Add drop shadow.
Copy and paste WP_IAD_BIRD as new layer. Move to top left of the
tag.** Add drop shadow.
Copy and paste WP_IAD_FLOWER4 as new layer. Move to left of tag.**
Add drop shadow.
Copy and paste WP_IAD_CANDLES as new layers. Using pick tool resize
to a smaller size. Move to bottom right of tag.** Duplcate using pick
tool resize it to a different size. Repeat. Place them kinda of infront
of each other kinda zig zag.** Add drop shadow.
Add copyright info. Merge layers.Now for the Animation.
Open animation shop.
File Open new find the candle flames and open them.
Edit Select All.
In PSP copy the layers and then paste as new
animation in AS. Edit Duplicate selected till you
have same amount of frames as the candle flame.
Edit Select all.
Now take the flame from frame 1 amd move to over the flame
on frame one on one of the candles. Go back to candle frames and
hit undo you will see them reapear. Repeat for the other two falmes.
Back in PSP put your name on the tag add drop shadow. Copy and paste
as new layer. Copy that and past as new layer in AS. Edit Duplicate
selected till you have same amount of frames as your tag. Repeat same
process for your name as you did for the flames.
Save it and you are done.
This tutorial was written by Rebecca Townsley on 7/24/14.
Any similarity to any other tutorial is purely coincidental.
Any creations you make following this tutorial is yours
to do with as you please as long as there is no profit made.
This tutorial is not to be copied or passed around.
I would love to see your results!
If you would like them shown on my blog
Send them to dragonsfairy_25@hotmail.com with
Devine in the subject line.
Can't wait to check them out!
Tuesday, September 24, 2013

This tut was made using PSPx4
And knowledge of PSPx4.
Supplies needed
Tube of choice. I used one by Elias Chatzoudis.
You need a license to use his work. You can get it
and his work at Elias Art Shop.
PTU kit Scary Cool by Gimptastic Scraps.
You can get it at The PSP Project.
Mask of Choice I used 570 Insatiable Dreams Mask and 530 Insatiable Dreams.
You can get 230 Here.
You can get 270 Here.
Font of choice I used Words - Saginaw.
Font of choice I used name - Alix2.
If you Choose to add the words Will need EyeCandy 4000
Gradient Glow
Go ahead and open list of Things here used and go ahead and resize them
by the percentage by each item. If there is no number no need to resize.
Paper1
570 Insatiable Dreams Mask
Paper5
530 Insatiable Dreams Mask
Frame6
Wire
Tube
Belt
Flowers1
SkullHeart - 80%
Heels - 75%
When you see ** look at tag to see placement for Elements.
Sometimes it is hard to say just how to place it.
Drop shadows added are 0.0.75.7 unless otherwise stated.
You do not have to add drop shadow...I just do it for effects.
It is always good to check for overhang of shadow on edges of tag.
I have made a tag or to and not check and when I got done
I would post it and see the over hang on the sides and think MAN!! lol
Remember to save often.
Open new Image 700x700.
Copy and paste Paper1 as new layer. Layers, new mask layer
choose the mask from the list click ok Merge group.
Copy and paste Paper5 as new layer. Layers, new mask layer
choose the mask from the list click ok Merge group.
Copy and paste Frame6 as new layer.
Add drop shadow.
Copy and paste Wire as new layer. Move to top of frame.** Duplicate
Move to Bottom of frame.** Duplicate Image free rotate 90 to the right.
Move to right of frame.** Duplicate Move to left of frame.** Erase any
hangover from the wires on the sides. Merge the wires together.
Add drop shadow.
Copy and paste tube as new layer. Duplicate Blend mode Hardlight.
Merge down. Add drop shadow. Move slightly to the right.**
Copy and paste Belt as new layer. Move to bottom of frame.**
Add drop shadow.
Copy and paste FLowers1 as new layer. Move to the left of frame.**
Add drop shadow.
Copy and paste SkullHeart as new layer. Move to the top right.**
Add drop shadow
Copy and paste Heels as new layer. Move to bottom right.**
Add drop shadow.
Resize all using Pixels by 600x600
For words if you choose to add them, you will need EyeCandy 4000
Gradient Glow settings 4,25,100 Color white Drop shadow 2, 2, 6, 100.
Add proper copyright. url and Lic if required
and your name. And were done.
This tutorial was written by Rebecca Townsley on 9/25/13.
Any similarity to any other tutorial is purely coincidental.
Any creations you make following this tutorial is yours
to do with as you please as long as there is no profit made.
This tutorial is not to be copied or passed around.
I would love to see your results!
If you would like them shown on my blog
Send them to dragonsfairy_25@hotmail.com with
PTU Love and Ghosts in the subject line.
Can't wait to check them out!
Tuesday, August 20, 2013

This tut was made using PSPx4
And knowledge of PSPx4.
Supplies needed
Tube of choice. I used one by Elias Chatzoudis.
You need a license to use his work. You can get it
and his work at Elias Art Shop .
PTU kit Summer Haze by Tasha's Playground.
Mask of Choice I used MB and SW Mask 25 by Moonbeams and Spiderwebs.
You can get it Here.
Font of choice I used MA Sexy.
Go ahead and open list of Things here used and go ahead and resize them
by the percentage by each item. If there is no number no need to resize.
paper7 - 75%
MB and SW Mask 25
net
anchor
tube - 65% or resize to fit
splash2 - 75%
palm tree - 80%
lifesaver - 50%
poles
seagull1 - 50%
shells2 - 50%
When you see ** look at tag to see placement for Elements.
Sometimes it is hard to say just how to place it.
Drop shadows added are 0.0.75.7 unless otherwise stated.
You do not have to add drop shadow...I just do it for effects.
It is always good to check for overhang of shadow on edges of tag.
I have made a tag or to and not check and when I got done
I would post it and see the over hang on the sides and think MAN!! lol
Remember to save often.
Open new Image 600x600.
Copy and paste paper7 as new layer. Layers, new mask layer
choose the mask from the list click ok Merge group.
Copy and paste net as new layer.
Copy and paste anchor as new layer. Move to the left and down.**
Add drop shadow.
Copy and paste tube as new layer. Move her down and and just over
the anchor.** Add drop shadow.
Copy and paste splash2 as new layer. Move to to have bottom of splash
be even with bottom of mermaid.**
Copy and paste palm tree as new layer. Move to right of tag a bit.**
Add drop shadow.
Copy and paste lifesaver as new layer. Move to over palm tree to
look like it is haning on the tree.** Add drop shadow.
Copy and paste poles as new layer. Move to bottom right of tag.**
Add drop shadow.
Copy and paste seagull1 as new layer. Move to over the poles to
make it look like it is standing on them.** Add drop shadow.
Copy and paste shells2 as new layer. Place at bottom of poles.**
Add drop shadow.
Add proper copyright. url and Lic if required
and your name. And were done.
This tutorial was written by Rebecca Townsley on 8/20/13.
Any similarity to any other tutorial is purely coincidental.
Any creations you make following this tutorial is yours
to do with as you please as long as there is no profit made.
This tutorial is not to be copied or passed around.
I would love to see your results!
If you would like them shown on my blog
Send them to dragonsfairy_25@hotmail.com with
PTU Mermaid Summer in the subject line.
Can't wait to check them out!
Tuesday, June 25, 2013

This tut was made using PSPx4
And knowledge of PSPx4.
Supplies needed
Tube of choice. I used one by Elias Chatzoudis.
You need a license to use his work. You can get it
and his work at Elias Art Shop.
FTU kit Spring Time Mini Kit by Tasha's Playground.
Mask of Choice I used Moonbeams and Spiderwebs mask 5.
You can get it Here.
Font of choice I used Vivacious.
Go ahead and open list of Things here used and go ahead and resize them
by the percentage by each item. If there is no number no need to resize.
paper1
MB and SW Mask 5
frame2
grass-50%
tube
bunny-75%
butterflies-75%
pond
When you see ** look at tag to see placement for Elements.
Sometimes it is hard to say just how to place it.
Drop shadows added are 0.0.75.7 unless otherwise stated.
You do not have to add drop shadow...I just do it for effects.
It is always good to check for overhang of shadow on edges of tag.
I have made a tag or to and not check and when I got done
I would post it and see the over hang on the sides and think MAN!! lol
Remember to save often.
Open new Image 600x600.
Copy and paste paper1 as new layer.
Move to bottom layer. Layers, new mask layer,
from image, find mask in the list, click ok
merge group.
Copy and paste frame2 as new layer.
Copy and paste grass as new layer. Put to left
of tag. Add drop shadow. Duplicate move to right
of grass, repeat this 2 more times. Merge the
grass layers together. Move to behind frame at
bottom of frame. Using Eraser tool erase any grass
overhang from sides and or bottom of frame.
Copy and paste tube as new layer. Move down a tad.**
Duplicate Blend Hardlight, merge down. On Frame
selections ,float, defloat, using eraser tool,
erase the hand and part of kneww on right of tube.
Makes it look like that part of the tube is in the
frame. Selections none. Add drops shadow to frame.
Copy and paste bunny as new layer. Move to bottom
left of frame.** Add drop shadow 0,0,62,15.
Copy and paste butterflies as new layer. Move to
top right of frame.** Same Drop shadow as on the
bunny.
Copy and paste pond as new layer. Move to bottom
of frame and then behind the grass layer.** Useing
eraser tool erase any overhang from pond on bottom
and or sides of frame.
Add proper copyright. url and Lic if required
and your name. And were done.
This tutorial was written by Rebecca Townsley on 6/25/13.
Any similarity to any other tutorial is purely coincidental.
Any creations you make following this tutorial is yours
to do with as you please as long as there is no profit made.
This tutorial is not to be copied or passed around.
I would love to see your results!
If you would like them shown on my blog
Send them to dragonsfairy_25@hotmail.com with
FTU Natures Fae in the subject line.
Can't wait to check them out!
Sunday, December 23, 2012

This tut was made using PSPx5
And knowledge of PSPx5.
Supplies needed
PTU kit Such a Diva by Scrappin Krazy Designs.
You can get it HERE.
Tube of Choice. I am using Elias Chatzoudis.
You need a lic to use his work. You can get it and his work HERE.
Template used EI#133 by Elegant Inspirations.
You can get it HERE.
Mask used MB and SW Mask 39 by MoonBeams and SpiderWebs.
Can Get it HERE.
Font of choice I used Send Flowers.
You can get it HERE.
Go ahead and open list of Things here used and go ahead and resize them
by the percentage by each item. If there is no number no need to resize.
mask
tube
ele26
ele10
p15
p14
p13
p10
p08
p06
When you see ** look at tag to see placement for Elements.
Sometimes it is hard to say just how to place it.
Drop shadows added are 0.0.100.4 unless otherwise stated.
It is always good to check for overhang of shadow on edges of tag.
I have made a tag or to and not check and when I got done
I would post it and see the over hang on the sides and think MAN!! lol
Remember to save often.
Open Template hit Shift+D to duplicate Close the original.
Select Brown Square 1 merge down to Brown Square 2
Selections all, float, defloat, invert
Copy and paste p15 as new layer
Delete Select none add Drop Shadow.
Delete original layer.
Select Brown Cirle 3
Selections all, float, defloat, invert
Copy and paste p15 as new layer
Delete Select none add Drop Shadow.
Delete original layer.
Repeat with Brown Circle 1 and 2.
Select Blue Circle 4
Selections all, float, defloat, invert
Copy and paste p10 as new layer
Delete Select none add Drop Shadow.
Delete original layer.
Repeat for Blue Circle 1, 2, and 3.
Select Off White Cirle 1
Selections all, float, defloat, invert
Copy and paste p13 as new layer
Delete Select none add Drop Shadow.
Delete original layer.
Repeat for Off White Circles 2 and 3.
Select Off White Circle 4
Selections all, float, defloat, invert
Copy and paste p13 as new layer
Delete Select none add Drop Shadow.
Delete original layer.
Repeat for Off White Circle 5
Select White Square1
Selections all, float, defloat, invert
Copy and paste p08 as new layer
Delete Select none add Drop Shadow.
Delete original layer.
Repeat for White Square 2 and white dots.
Copy and paste ele26 as new layer.
Make it the top layer. Move down a
bit and have it centered.**
Add drop shadow.
Copy and paste tube as new layer.
Place it Under ele26. Will be
kinda centered.**
Add drop shadow.
Copy and paste ele06 as new layer.
Move toover the left circle.**
Add drop shadow. Duplicate,
Image , Flip horizontal,
move over to right circle.**
Copy and paste p06 as new layer.
Make this the bottom layer.
Layers, new mask layer, from image
Find the mask in the list click ok.
Merge group, Adjust , add/remove noise
add noise of 67% Adjust Blur, blur.
Add proper/clear copyright and Lic.# (If Needed)
Add your name and your done.
This tutorial was written by Rebecca Townsley on 12/23/12.
Any similarity to any other tutorial is purely coincidental.
Any creations you make following this tutorial is yours
to do with as you please as long as there is no profit made.
This tutorial is not to be copied or passed around.
I would love to see your results!
If you would like them shown on my blog
Send them to dragonsfairy_25@hotmail.com with
PTU Such a Diva in the subject line
Can't wait to check them out!
Tuesday, October 30, 2012

This tut was made using PSPx5
And knowledge of PSPx5.
Supplies needed
PTU Kit Wild One by Rissa's Designs HERE.
Tube of Choice. I am using Elias Chatzoudis.
You need a lic to use his work. You can get it and his work HERE.
Mask used MB and SW Mask 20 from Moonbeams and Spiderwebs.
You can get it HERE. I love her masks!
Template used PunkyPookerCollabTemp1 from Elegant Insperations.
You can get the template HERE.
Font of choice I used Ravie. You can get it HERE.
When you see ** look at tag to see placement for Elements.
Sometimes it is hard to say just how to place it.
Drop shadows added are 0.0.100.4 unless otherwise stated.
It is always good to check for overhang of shadow on edges of tag.
I have made a tag or to and not check and when I got done
I would post it and see the over hang on the sides and think MAN!! lol
Remember to save often.
Open Template Shift+D to duplicate close original.
Delete the CR info layer.
Adjust - Add/Remove noise - Add Noise Settings
Gaussian 50% Monochrome Checked On the following layers..
Black Squares
Left Cirlce Frame
Right Circle Frame
Middle Circle Frame
Left Square Frame
Right Square frame
Lil Black Circle
Black Rectangle
Purple Circle Back1
Purple Circle Back2
Purple Rect1
Purple Rect2
Add Drop Shadow to those layers as well.
Open RD_Paper12 Make it your pattern and using floodfill
Match mode RGB Value, Tolerance 10, Use all layers unchecked,
Blend mode normal, opacity 100 Flood fill Following layers
Left Square
Right Square
Repeat that step with the following papers and layers.
Open RD_Paper8 on Black Circle. Add Drop Shadow
Open RD_Paper2 use on White circle2 and White Circle3
Open RD_Paper9 use on Pink Rectangle, Pink Rect1, and Pink Rect2
Open RD_Paper7 use on Left Circle, Right Circle, and Middle Circle
Open RD_Paper6 Use on White Circle1
On to the Elements.
Open RD_Bones String 1 Copy and paste as new layer
over the Dotted lines layer and move to top right of tag.**
Add Drop shadow.
Move Black Squares down to over left square frame.
Open RD_Swirlie 1 Copy and paste as new layer over the Black Squares.
Move to left of tag.** Add drop shadow.
Open RD_Case Resize by 75% Copy and paste as new layer.
Move to bottom left of tag.** Add drop shadow.
Open Barbed Heart 3 resize by 75% Copy and paste as new layer.
Move to bottom right of tag.** Add drop shadow.
Open RD_Speakers Copy and paste as new layer. Place under the heart layer.
Move to bottom Right of tag.** Add Drop Shadow.
Resize all layers by 67%.
Open Tube copy and paste as new layer.Copy and paste as new layer Just under
the case layer. Place to the left over the Left Circle Frame.** Add drop Shadow.
Use eraser tool erase bottom of tube to look like it is coming out of frame
If using a half tube. If whole place where you think it should be.
Open RD_City Scape 2 Resize by 90% Copy and paste as new layer over the
White Dotted layer.
Open RD_Paper6 paste as new layer move all way to bottom layer.
Open mask Layers - new mask layer - From Image Select the mask in the list
Click ok Merge Group. Change Opacity to 50.
Add proper/clear copyright and Lic.# (If Needed)
Add name. Using the following Settings Add drop shadow
and your done.

This tutorial was written by Rebecca Townsley on 10/23/12.
Any similarity to any other tutorial is purely coincidental.
Any creations you make following this tutorial is yours
to do with as you please as long as there is no profit made.
This tutorial is not to be copied or passed around.
I would love to see your results!
If you would like them shown on my blog
Send them to dragonsfairy_25@hotmail.com with
PTU I'm a Wild One Result in the subject line
Can't wait to check them out!
Thursday, September 20, 2012

This tut was made using PSPx4
And knowledge of PSPx4.
Supplies needed
PTU kit Pumkin Moon by Irish Princess Designs HERE.
Tube of Choice. Preferably one with a close up. I am using Elias Chatzoudis.
You need a lic to use his work. You can get his work HERE.
Template by BKC Designs you can get it HERE.
Font of Choice I used Harington .You can get it HERE.
Mask used Halloween mask 2 by WeeScotsLassCreations.
You can get it HERE.
When you see ** look at tag to see placement for Elements.
Sometimes it is hard to say just how to place it.
Drop shadows added are 0.0.100.4 unless otherwise stated.
It is always good to check for overhang of shadow on edges of tag.
I have made a tag or to and not check and when I got done
I would post it and see the over hang on the sides and think MAN!! lol
Remember to save often.
Open template. Shift+D to Duplicate. Close original.
Delete the credits and the credits background.
Choose a color or two from your tube using change to target brush go over
orange circle, orange rectangle, and orange square.
On Orange square Selections - all - float - defloat - Invert.
Open IBD_paper2 resize by 69% copy and paste as new layer Delete
Selections none. Blend mode Screen.
On Black square Selections - all - float - defloat - Invert.
Open IBD_paper1 resize by 69% copy and paste as new layer Delete
Selections none.
On orange rectangle Selections - all - float - defloat - Invert.
Open IBD_paper4 resize by 69% copy and paste as new layer Delete
Selections none. Blend mode Screen.
On Black rectangle Selections - all - float - defloat - Invert.
Using IBD_paper1 resize by 69% copy and paste as new layer Delete
Selections none.
On Orange circle Selections - all - float - defloat - Invert.
Open your tube using the close up place to the left of circle** - delete
Slections none. Blend mode Darken. Drop shadow of 0, 0, 100, 9.
Erase any shadow overhang you see on sides of tag from tube.
On small strips 1, 2, and 3, floodfill using a color from tube
and black for a gradiant color.
On Orange circle Selections - all - float - defloat - Invert.
Open tube copy and paste as new layer to right of circle**
Erasing only the bottom part to look like she is standing in the circle.
Open IBD_skullsitter resize by 50% copy and paste as new layer
place to bottom left of tag.**
Open IBD_beware resize by 50% copy and paste as new layer.
Place to right of tag at bottom just over lapping the skullsitter.**
Open IBD_Teethdrip resize by 30% copy and paste as new layer.
Place behind tube kinda center like.**
On bottom layer flood fill using a color from tag or
copy and paste one of the papers.
Open mask and on tag Layers - new mask layer - from image.
Find the mask in the list click on it then ok. Merge Groups.
I added a drop shadow to all the elements, tube and the
Black circle, rectangle, and square and all the small strips.
Add proper/clear copyright and Lic.# (If Needed)
Add name and your done.
This tutorial was written by Rebecca Townsley on 9/20/12.
Any similarity to any other tutorial is purely coincidental.
Any creations you make following this tutorial is yours
to do with as you please as long as there is no profit made.
This tutorial is not to be copied or passed around.
I would love to see your results!
If you would like them shown on my blog
Send them to dragonsfairy_25@hotmail.com with
PTU Beware Result in the subject line
Can't wait to check them out!
Monday, December 26, 2011

This tut was made using PSPx2
And knowledge of PSPx2.
Supplies needed
PTU Kit Black Ice from Tasha's Playground.
Tube of Choice I used Elias Chatzoudis. You need a lic to use his work.
You can get it and his work at his store HERE.
Font Of Choice I used Satisfaction which is a PTU font
When you see ** look at tag to see placement for Elements.
Sometimes it is hard to say just how to place it.
Drop shadows added are 0.0.100.4 unless otherwise stated.
It is always good to check for overhang of shadow on edges of tag.
I have made a tag or to and not check and when I got done
I would post it and see the over hang on the sides and think MAN!! lol
Remember to save often.
Start a new Rastor layer 600x600
Open frame2 resize by 90% copy and
paste as new layer. Add Drop Shadow
Use magic wand click inside frame -
selections modify by 15-invert
Open paper13 resize by 61% copy and
paste as new layer under frame. Delete
Open and copy your tube. Paste under frame layer**
erase any excess from around frame.
Add Drop Shadow.
Open Skull copy Resize by 75% and
paste as new layer** Add Drop shadow
Open crow resize by 50% and place
on crows head** Add drop shadow
Open Start Scatter resize by 85% copy and
place as new layer under the tube layer
Open spider copy and paste as new layer at
top Image free rotate to the right by 20**
Open sparkle2 copy and paste as new
layer move to under tube layer
Open bow copy and paste as new layer
above frame layer ** add drop shadow
Open black pearls copy and paste under
paper layer at bottom** Duplicate - Mirrow - Flip
Resize all layers checked by 92%
Add proper and clear copyright, URL, and Lic(if needed)
Add name and your done.
This tutorial was written by Rebecca Townsley on 12/26/11.
Any similarity to any other tutorial is purely coincidental.
Any creations you make following this tutorial is yours
to do with as you please as long as there is no profit made.
This tutorial is not to be copied or passed around.
I would love to see your results!
If you would like them shown on my blog
Send them to dragonsfairy_25@hotmail.com with
PTU Black Beauty Tut Result in the subject line
Can't wait to check them out
Thursday, December 8, 2011

This tut was written using PSPx2
And knowledge of PSPx2
Tubes - Elias Chatzoudis
You must have a lic. to use his work and you can get it at his store HERE.
Template - TTsTemp 006 from Twyzted T's Playroom HERE
Template - TTsTemp 006 from Twyzted T's Playroom HERE
Teezer has some Awesome templates and has decided to start sharing them!
Thank you T for sharing them and allowing me to use it in this tut!
Mask of Choice
Font of choice I used - Amethyst which is a PTU font
Kit used From the Heart from BNB Blogtrain for Artmama which you can get HERE
Mask of Choice
Font of choice I used - Amethyst which is a PTU font
Kit used From the Heart from BNB Blogtrain for Artmama which you can get HERE
And don't forget all the other goodies in the train!!
Open template then hit Shift + D to copy then close original
Delete the top layer with all of her info thats on it
open up paper of choice I used paper FTH Paper 014 and copy then close
select the back rectangle layer selections - select all - float - defloat - invert
Paste paper as new layer - delete Selections - none add drop shadow of choice
I used 0,0,100,8. You should see some of the drop shadow on top and bottom of tag
just erase it if you do.
Open paper of choice I used FTH Paper 009 copy then close
select Rectangle 2 layer - selections - select all - float - defloat - invert
Paste paper as new layer - delete Selections - none
Frame 2 - layer use select to target and used a color from the sec paper I used
add drop shadow of choice I used 0,0,100,6
Rectangle 1 - use change to target and use the same color you used for frame 2
Karma 2 - layer change oposity to 70
Frame 1 layer - use change to target tool and pick a color from the first paper you used
add drop shadow of choice I used 0,0,100,6
Open paper of choice I used FTH Paper 003 copy then close
Select Left square - selections - select all - float - defloat - invert
paste paper as new layer - delete then selections none
Change to target tool and change the color to a color that matches
the tube you will put there.
Repeat for right sqaure only this time use a different color from
tube you will put in that square.
Left and right square frame - change to target tool and change to color from paper or tube.
Open the tubes you have chosen. Now on the left square frame selections - select all - float - defloat - invert
Paste tube as new layer where you want it resize if needed make sure it is over the paper part delete selections none
add drop shadow of choice I used 0,0,100,6. You should see some of the drop shadow on bottom
of tag just erase it if you do.
On Left square frame - add drop shadow of choice I used 0,0,100,6.
Right Sqaure frame add drop shadow - 0,0,100,6
Right Square - Paste your tube as new layer under the frame resize if needed erase tube
from all side of of square except from top selections - select all - float - defloat
on right square frame erase top of frame - selections - none now it looks like her head
is kinda sticking out from the top. add drop shadow to tube 0,0,100,6
Now take your change to target and use the 2 colors you used earlier from the papers and
change colors in the shapes under the KARMA letters. Merge the shapes - Effects - Textures
Blinds - width 11 - Opacity - 18 color light color from tubes - Horizontal checked and then again
only have Horizontal unchecked. Effects - Inner Bevel - Bevel 2 Width 18 First row numbers -
94,5,-20,17 Second row numbers 225, 40,50 click on ok drop shadow 0, 0, 100, 8
Flood fill the letters with the opposite color you used on the shape it is on. Effects - Texture
Weave - 2, 8, 1 color dark color from tube fill gaps checked
Now open up FTH Doodle copy and paste as new layer , Image flip move to bottom left just
above first layer add drop shadow 0,0,100,8 duplicate - Image mirror, image flip
Take first layer flood fill with color from tube, open your mask , Layer, New mask layer, Invert mask
unchecked if mask you picked has a dark background.
Resize all layers using the pixles not the percent and change top one from 693 - 600 as long as
they are locked both will change to what it needs to be.
Add you tube to the top of the tag resize if needed add drop shadow 0,0,100,8,
add what elements you would like to add from the kit
Select your font type out the name how ever you like it to look add drop shadow 2, 2, 100, 6
Add proper copyright , URL, and Lic. info and were done!
This tutorial was written by Rebecca Townsley on 06/15/11.
Any similarity to any other tutorial is purely coincidental.
Any creations you make following this tutorial is yours
to do with as you please as long as there is no profit made.
This tutorial is not to be copied or passed around.
I would love to see your results!
If you would like them shown on my blog
Send email to dragonsfairy_25@hotmail.com with
FTU Karma Funk Tut Result in Subject line.
Cant wait to check them out!
Open template then hit Shift + D to copy then close original
Delete the top layer with all of her info thats on it
open up paper of choice I used paper FTH Paper 014 and copy then close
select the back rectangle layer selections - select all - float - defloat - invert
Paste paper as new layer - delete Selections - none add drop shadow of choice
I used 0,0,100,8. You should see some of the drop shadow on top and bottom of tag
just erase it if you do.
Open paper of choice I used FTH Paper 009 copy then close
select Rectangle 2 layer - selections - select all - float - defloat - invert
Paste paper as new layer - delete Selections - none
Frame 2 - layer use select to target and used a color from the sec paper I used
add drop shadow of choice I used 0,0,100,6
Rectangle 1 - use change to target and use the same color you used for frame 2
Karma 2 - layer change oposity to 70
Frame 1 layer - use change to target tool and pick a color from the first paper you used
add drop shadow of choice I used 0,0,100,6
Open paper of choice I used FTH Paper 003 copy then close
Select Left square - selections - select all - float - defloat - invert
paste paper as new layer - delete then selections none
Change to target tool and change the color to a color that matches
the tube you will put there.
Repeat for right sqaure only this time use a different color from
tube you will put in that square.
Left and right square frame - change to target tool and change to color from paper or tube.
Open the tubes you have chosen. Now on the left square frame selections - select all - float - defloat - invert
Paste tube as new layer where you want it resize if needed make sure it is over the paper part delete selections none
add drop shadow of choice I used 0,0,100,6. You should see some of the drop shadow on bottom
of tag just erase it if you do.
On Left square frame - add drop shadow of choice I used 0,0,100,6.
Right Sqaure frame add drop shadow - 0,0,100,6
Right Square - Paste your tube as new layer under the frame resize if needed erase tube
from all side of of square except from top selections - select all - float - defloat
on right square frame erase top of frame - selections - none now it looks like her head
is kinda sticking out from the top. add drop shadow to tube 0,0,100,6
Now take your change to target and use the 2 colors you used earlier from the papers and
change colors in the shapes under the KARMA letters. Merge the shapes - Effects - Textures
Blinds - width 11 - Opacity - 18 color light color from tubes - Horizontal checked and then again
only have Horizontal unchecked. Effects - Inner Bevel - Bevel 2 Width 18 First row numbers -
94,5,-20,17 Second row numbers 225, 40,50 click on ok drop shadow 0, 0, 100, 8
Flood fill the letters with the opposite color you used on the shape it is on. Effects - Texture
Weave - 2, 8, 1 color dark color from tube fill gaps checked
Now open up FTH Doodle copy and paste as new layer , Image flip move to bottom left just
above first layer add drop shadow 0,0,100,8 duplicate - Image mirror, image flip
Take first layer flood fill with color from tube, open your mask , Layer, New mask layer, Invert mask
unchecked if mask you picked has a dark background.
Resize all layers using the pixles not the percent and change top one from 693 - 600 as long as
they are locked both will change to what it needs to be.
Add you tube to the top of the tag resize if needed add drop shadow 0,0,100,8,
add what elements you would like to add from the kit
Select your font type out the name how ever you like it to look add drop shadow 2, 2, 100, 6
Add proper copyright , URL, and Lic. info and were done!
This tutorial was written by Rebecca Townsley on 06/15/11.
Any similarity to any other tutorial is purely coincidental.
Any creations you make following this tutorial is yours
to do with as you please as long as there is no profit made.
This tutorial is not to be copied or passed around.
I would love to see your results!
If you would like them shown on my blog
Send email to dragonsfairy_25@hotmail.com with
FTU Karma Funk Tut Result in Subject line.
Cant wait to check them out!
Subscribe to:
Posts
(Atom)