Saturday, May 10, 2014


This tut was made using PSPx4.
And knowledge of PSPx4.
Supplies needed
Tube of choice. I used one by Charles Bristow .
You need a license to use his work. You can get it
and his work here at Mystical Scraps.
PTU Kit Sweet Spring by Irish Princess Designs.
Mask of choice. I used Mask 44 MB and SW by Moonbeams and Spiderwebs.
Font of choice. I used Passions Conflict Rob.
Go ahead and open list of Things here used and go ahead and resize them
by the percentage by each item. If there is no number no need to resize.
Mask 44 MB and SW
IPD_SS_Paper3 - 60%
Tube - 65% or to fit
IPD_SS_Frame1 - 85%
IPD_SS_Bling
IPD_SS_Tree - 85%
IPD_SS_Swirl - 85%
IPD_SS_Flowers1 - 35%
IPD_SS_Flowers - 25%
IPD_SS_Scatter
When you see ** look at tag to see placement for Elements.
Sometimes it is hard to say just how to place it.
Drop shadows added are 0.0.100.4 unless otherwise stated.
It is always good to check for overhang of shadow on edges of tag.
I have made a tag or to and not check and when I got done
I would post it and see the over hang on the sides and think MAN!! lol
Remember to save often.
Start off with New image 600 x 600.
Copy and paste IPD_SS_Paper3 as new layer. Layers, New Mask layer.
Find the mask in the list Click ok. Merge group
Copy and paste IPD_SS_Frame1 as new layer.
Add drop shadow.
Copy and paste tube as new layer. Move her to bottom a bit and under the
frame. Add your drop shadow. Now on the tube Selections, all, float,
defloat. Select the frame layer and erase the part of the frame where
her mane is and front feet. Selections none. This make her look like
she is coming out of the frame.
Copy and paste IPD_SS_Bling as new layer.
Copy and paste IPD_SS_Tree as new layer. Move to left of tag.**
Add drop shadow.
Copy and paste IPD_SS_Swirl as new layer. Move to bottom of tag.**
Add drop shadow.
Copy and paste IPD_SS_Flowers1 as new layer. Move to bottom left.**
Add drop shadow.
Copy and paste IPD_SS_Flowers as new layer. Move to bottom right
of the first flowers.** Add drop shadow.
Copy and paste IPD_SS_Scatter as new layer.
Add proper copyright. url and Lic if required.
Add name and your done.
This tutorial was written by Rebecca Townsley on 5/9/14.
Any similarity to any other tutorial is purely coincidental.
Any creations you make following this tutorial is yours
to do with as you please as long as there is no profit made.
This tutorial is not to be copied or passed around.
I would love to see your results!
If you would like them shown on my blog
Send them to dragonsfairy_25@hotmail.com with
PTU Sweet Spring in the subject line
Can't wait to check them out!
Monday, May 5, 2014
Ok so I have been MIA for a bit.
I have not had any internet for awhile but now I do and I am back!!
Gonna get started on tuts and tags soon to show off for all the wonderful
CT Teams I am on and other tuts just cause I can lol.
With that being said I have made a snaggable facebook timeline cover.
Using the wonderful Tube art of Charles Bristow which can be found at Mystical Scraps and
PTU Scrap kit art of Irish Princess Designs called Steampunk Girl.
You can check out her blog HERE for details on how to get this wonderful kit!!!

Tuesday, January 21, 2014

This tut was made using PSPx4.
And knowledge of PSPx4.
Supplies needed
Tube of choice. I used one by Victoria Fox.
You need a license to use her work. You can get it
and her work here at *Coming Soon*
FTU kit Sweet Thing by Dangerously Delicious Designz.
Mask of choice. I used Mask 41 MB and SW by Moonbeams and Spiderwebs.
Font of choice. I used Saginaw.
Go ahead and open list of Things here used and go ahead and resize them
by the percentage by each item. If there is no number no need to resize.
DD_ST_Paper3 - 75%
Mask 41 MB and SW
Glitter_3 - 75%
Frame_3 - 85%
Hanging Heart - 50%
Leaf_3
Bow_2 - 85%
Tube - 85%
Flower_9 - 50%
wordart_1 - 75%
Bird_1 - 30%
When you see ** look at tag to see placement for Elements.
Sometimes it is hard to say just how to place it.
Drop shadows added are 0.0.100.4 unless otherwise stated.
It is always good to check for overhang of shadow on edges of tag.
I have made a tag or to and not check and when I got done
I would post it and see the over hang on the sides and think MAN!! lol
Remember to save often.
Start off with New image 600 x 600.
Copy and paste DD_ST_Paper3 as new layer. New layer Flood fill color from tube.
Layers, New Mask layer. Find the mask in the list Click ok. Merge group
Copy and paste Glitter_3 as new layer.
Copy and paste Frame_3 as new layer.
Add drop shadow.
Copy and paste Hanging Heart as new layer. Hang from center of frame.**
Add drop shadow.
Copy and paste Leaf_3 as new layer. Move to right of frame.**
Add Drop shadow.
Copy and paste Bow_2 as new layer. Move to top center of frame**
Add drop Shadow.
Copy and paste Tube as new layer. Move to left of frame.**
Add Drop shadow.
Copy and paste wordart_1 as new layer. Move to bottom of Frame.**
Add drop shadow.
Copy and paste Flower_9 as new layer. Move under the wordart layer and
to the bottom left of the wordart.** Add drop shadow.
Duplicate move to top right of wordart.
Copy and paste Bird_1 as new layer and place it at the top right of frame.**
Add drop shadow.
Add proper copyright. url and Lic if required.
Add name and your done.
This tutorial was written by Rebecca Townsley on 1/21/14.
Any similarity to any other tutorial is purely coincidental.
Any creations you make following this tutorial is yours
to do with as you please as long as there is no profit made.
This tutorial is not to be copied or passed around.
I would love to see your results!
If you would like them shown on my blog
Send them to dragonsfairy_25@hotmail.com with
FTU Sweet Thang in the subject line
Can't wait to check them out!
Friday, January 17, 2014


I would like to thank Julie aka Bits N Bobs for letting me work
with her wonderful new tube Cupid's Bow!
This tut was made using PSPx4.
And knowledge of PSPx4.
Supplies needed
Tube of choice. I used one by Bits N Bobs.
You need a license to use her work. You can get it
and her work here at Pics for Design.
FTU kit Love by Kittz (9th one down)and can be gotten at the Creative Misfits Blog.
Mask of choice. I used Forum Mask 14 MB and SW by Moonbeams and Spiderwebs.
Font of choice. I used Times New Romance.
Go ahead and open list of Things here used and go ahead and resize them
by the percentage by each item. If there is no number no need to resize.
LP24
Forum Mask 14 MB and SW
Love Corner Border
Love Cluster Flower
Tube
Love Birds - 30%
Love Dragonfly - 20%
When you see ** look at tag to see placement for Elements.
Sometimes it is hard to say just how to place it.
Drop shadows added are 0.0.100.4 unless otherwise stated.
It is always good to check for overhang of shadow on edges of tag.
I have made a tag or to and not check and when I got done
I would post it and see the over hang on the sides and think MAN!! lol
Remember to save often.
Start off with New image 600 x 250 for the Banner
Copy and paste LP24 as new layer. New layer Flood fill color from tube.
Layers, New Mask layer. Find the mask in the list Click ok. Merge group
Copy and paste Love Corner Border as new layer. Move down a bit.**
Add Drop shadow.
Copy and paste Love Cluster Flower as new layer. Move to bottom right.**
Add drop shadow.
Were gonna make a shadow box. :)
Using Selection Tools Rectangle Make a rectangle. You can look at tag above
to get a good idea on the size. Copy and paste tube as new layer. Resize by
85%. Move to where you see her head in the rectangle. Selections invert, Delete.
invert again. Add new layer move to under the tube layer add drop shadow of
0,0,100,15 Selections none. Add drop the usual drop shadow to tube. Merge the
tube and the shadow box together. Images, Flip Horizontal move to top right of banner.**
Duplicate resize by 75% Images, Flip Horizontal move to bottom left of banner.**
Copy and paste tube as new layer. Resize by 50%.
I have her placed in the center of the banner.**
Add drop shadow.
Copy and paste Love Birds as new layer. Move to bottom right of banner.**
Add Drop shadow.
Copy and paste Love Dragonfly as new layer. Move to top left of banner.**
Add drop shadow. Duplicate, resize by 85% Images, Flip Horizontal move down
and to the right a bit.**
New Layer Selections all Modify Contract by 3 Invert floodfill with color of choice.
I used black. Selections none. Add drop shadow.
Add proper copyright. url and Lic if required.
Add name and your done.
For the Avatar
Shift + D to duplicate the Banner you just made.
On the Duplicate...I used crop tool settings 150 x 150
Set it to the upper left of the banner. Deleted the Frame, copyright info, and
shadow box tube layers. Merged Visable, new layer Selections all modify Contract
by 3 Invert Flood fill with same color as Banner frame. Selections none. Add Name
or Initial.
This tutorial was written by Rebecca Townsley on 1/17/14.
Any similarity to any other tutorial is purely coincidental.
Any creations you make following this tutorial is yours
to do with as you please as long as there is no profit made.
This tutorial is not to be copied or passed around.
I would love to see your results!
If you would like them shown on my blog
Send them to dragonsfairy_25@hotmail.com with
FTU Cupids Bow in the subject line
Can't wait to check them out!
Friday, January 10, 2014


This tut was made using PSPx4.
And knowledge of PSPx4.
Supplies needed
Tube of choice. I used one by Arthur Crowe.
You need a license to use his work. You can get it
and his work here at Arthur Crowe's Factory.
PTU kit Peppermint Pinky by Irish Princess Designs.
Mask of choice. I used MB and SW Mask 15 by Moonbeams and Spiderwebs.
Font of choice. I used Arizonia.
Go ahead and open list of Things here used and go ahead and resize them
by the percentage by each item. If there is no number no need to resize.
IBD_PP_Paper1 - 75%
MB and SW Mask 15
IBD_PP_Scatter
IBD_PP_Trees
IBD_PP_Frame1 - 85%
IBD_PP_Bow1 - 75%
tube - 65%
IBD_PP_Cupcake - 45%
IBD_PP_Cakepops - 40%
IBD_PP_Candy1 - 30%
When you see ** look at tag to see placement for Elements.
Sometimes it is hard to say just how to place it.
Drop shadows added are 0.0.100.4 unless otherwise stated.
It is always good to check for overhang of shadow on edges of tag.
I have made a tag or to and not check and when I got done
I would post it and see the over hang on the sides and think MAN!! lol
Remember to save often.
Start off with New Image 600 x 600
Copy and paste IBD_PP_Paper1 as new layer. Layers, New Mask layer
Find the mask in the list Click ok. Merge group
Copy and paste IBD_PP_Scatter as new layer.
Copy and paste IBD_PP_Trees as new layer.
Add drop shadow.
Copy and paste IBD_PP_Frame1 as new layer.
Add drop shadow.
Copy and paste IBD_PP_Bow1 as new layer. Move to top of frame.**
Add drop shadow.
Copy and paste tube as new layer. Move to right of frame.**
Add Drop shadow.
Copy and paste IBD_PP_Cupcake as new layer. Move to bottom left of frame.**
Add drop shadow.
Copy and paste IBD_PP_Cakepops as new layer. Move to right of cupcake.**
Add drop shadow.
Copy and paste IBD_PP_Candy1 as new layer. Move to right of suckers.**
Add drop shadow.
Add proper copyright. url and Lic if required.
Add name and your done.
This tutorial was written by Rebecca Townsley on 1/10/14.
Any similarity to any other tutorial is purely coincidental.
Any creations you make following this tutorial is yours
to do with as you please as long as there is no profit made.
This tutorial is not to be copied or passed around.
I would love to see your results!
If you would like them shown on my blog
Send them to dragonsfairy_25@hotmail.com with
PTU Winter Peppermint in the subject line
Can't wait to check them out!
Friday, December 6, 2013
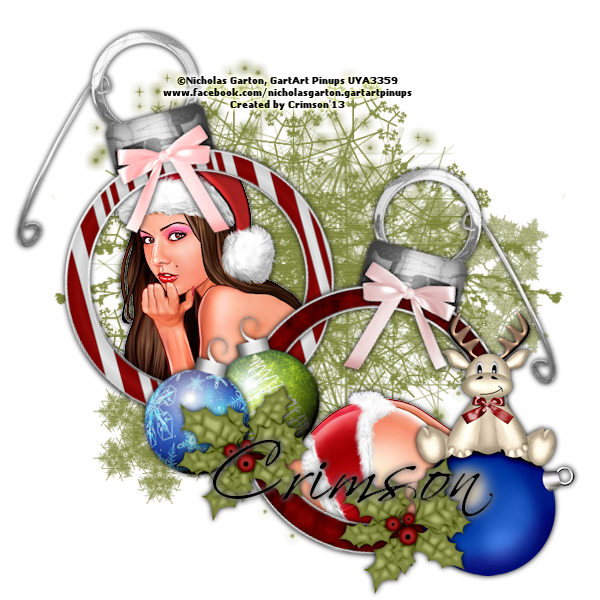
This tut was made using PSPx4
And knowledge of PSPx4.
Supplies needed
Tube of choice. I used one by Nicholas Garton.
You need a license to use his work. You can get it
and his work at *Coming Soon*
PTU kit Tree Trimming Fun by Artlor Designs at Mystical Scraps Store.
Mask of Choice I used MB and SW Mask 11 by Moonbeams and Spiderwebs.
Font of choice I used Scriptina.
Go ahead and open list of Things here used and go ahead and resize them
by the percentage by each item. If there is no number no need to resize.
AD-Paper13 - 75%
MB and SW Mask 11
AD-OrnamentFrame4 - 60%
AD-OrnamentFrame2 - 60%
tube head in frame4
tube butt in frame2
AD-ChristmasBall1 - 35%
AD-ChristmasBall2 - 35%
AD-ReindeerWithOrnament - 50%
AD-HollyBerries - 50%
Scriptina
When you see ** look at tag to see placement for Elements.
Sometimes it is hard to say just how to place it.
Drop shadows added are 0.0.75.7 unless otherwise stated.
You do not have to add drop shadow...I just do it for effects.
It is always good to check for overhang of shadow on edges of tag.
I have made a tag or to and not check and when I got done
I would post it and see the over hang on the sides and think MAN!! lol
Remember to save often.
Open new Image 600x600.
Copy and paste AD-Paper13 as new layer. Layers, new mask layer
choose the mask from the list click ok Merge group.
Copy and paste AD-OrnamentFrame4 as new layer. Image, free rotate,
15 degrees to left. Move up and to left some.**
Add drop shadow.
Copy and paste AD-OrnamentFrame2 as new layer. Image, free rotate,
15 degrees to right. Move up and to left some.**
Add drop shadow.
Copy and paste tube as new layer. Put behind frame4 and show the head.
Erase any overhang from outside the frame.**
Add drop shadow.
Copy and paste tube as new layer. Put behind frame2 and show the butt.
Erase any overhang from outside the frame.**
Add drop shadow.
Copy and paste AD-ChristmasBall1 as new layer. Image, free rotate,
15 degrees to the left. Place just in center of frames and down
a bit.** Add drop shadow.
Copy and paste AD-ChristmasBall2 as new layer. Image, free rotate,
15 degrees to the right. Place just to left and down from other
Christmasball.** Add drop shadow
Copy and paste AD-ReindeerWithOrnament as new layer. Place at bottom
right of tag.** Add drop shadow.
Copy and paste AD-HollyBerries as new layer. Move to over Ornaments.**
Duplicate and move to beside the ball with the moose.**
Add drop shadow.
Add proper copyright. url and Lic if required
and your name. And were done. On the name Dropshadow used was
2,2, 100, 10 white then again with black.
This tutorial was written by Rebecca Townsley on 12/06/13.
Any similarity to any other tutorial is purely coincidental.
Any creations you make following this tutorial is yours
to do with as you please as long as there is no profit made.
This tutorial is not to be copied or passed around.
I would love to see your results!
If you would like them shown on my blog
Send them to dragonsfairy_25@hotmail.com with
Ornament Crazy in the subject line.
Can't wait to check them out!
Thursday, November 28, 2013

This tut was made using PSPx4
And knowledge of PSPx4.
Supplies needed
Tube of choice. I used one by Keith Garvey.
You need a license to use his work. You can get it
and his work at Garve Girls PSP Tubes.
PTU kit Winter Blush by Tasha's Playground.
Mask of Choice I used the one supplied in the kit.
Font of choice I used Santa's Sleigh.
Go ahead and open list of Things here used and go ahead and resize them
by the percentage by each item. If there is no number no need to resize.
paper7 - 75%
mask from kit
swirl
frame1
berry
branch2
berries2 fh
dry flower
branches
berries
tube - resize to fit
move to over frame
ornament1 - 50%
snowflakes3
When you see ** look at tag to see placement for Elements.
Sometimes it is hard to say just how to place it.
Drop shadows added are 0.0.75.7 unless otherwise stated.
You do not have to add drop shadow...I just do it for effects.
It is always good to check for overhang of shadow on edges of tag.
I have made a tag or to and not check and when I got done
I would post it and see the over hang on the sides and think MAN!! lol
Remember to save often.
Open new Image 600x600.
Copy and paste paper7 as new layer. Layers, new mask layer
choose the mask from the list click ok Merge group.
Copy and paste swirl as new layer.
Copy and paste frame1 as new layer. May have to move
down some.
Copy and paste berry as new layer. Move to left of frame.**
Add drop shadow.
Copy and paste branch2 as new layer. Move to left of frame.
Just to right of berry.** Add drop shadow.
Copy and paste berries2 as new layer. Images Flip Horizontal.
Move to right of frame.** Add drop shadow.
Copy and paste dry flower as new layer. Move to left of frame
just over the berries2.** Add drop shadow
Copy and paste branches as new layer. Move to bottom of frame.**
Add drop shadow.
Copy and paste berries as new layer. Place n center of branches.**
Add drop shadow.
Copy and paste tube as new layer. Place above frame layer.**
Erase any over hang you see from under the bottom of branches.
Add drop shadow.
Copy and paste ornament1 as new layer. Move to the bottom left of tag.**
Add drop shadow.
Add proper copyright. url and Lic if required
and your name. And were done.
This tutorial was written by Rebecca Townsley on 11/28/13.
Any similarity to any other tutorial is purely coincidental.
Any creations you make following this tutorial is yours
to do with as you please as long as there is no profit made.
This tutorial is not to be copied or passed around.
I would love to see your results!
If you would like them shown on my blog
Send them to dragonsfairy_25@hotmail.com with
Winter Blush in the subject line.
Can't wait to check them out!
Subscribe to:
Posts
(Atom)