Friday, December 6, 2013
This tut was made using PSPx4
And knowledge of PSPx4.
Supplies needed
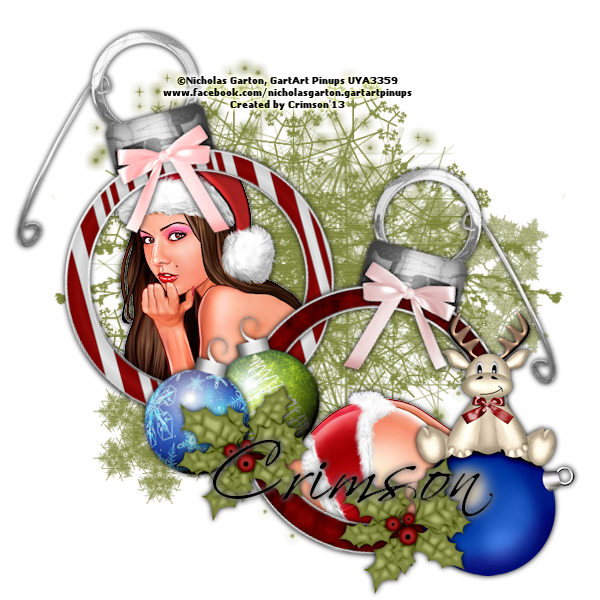
Tube of choice. I used one by Nicholas Garton.
You need a license to use his work. You can get it
and his work at *Coming Soon*
PTU kit Tree Trimming Fun by Artlor Designs at Mystical Scraps Store.
Mask of Choice I used MB and SW Mask 11 by Moonbeams and Spiderwebs.
Font of choice I used Scriptina.
Go ahead and open list of Things here used and go ahead and resize them
by the percentage by each item. If there is no number no need to resize.
AD-Paper13 - 75%
MB and SW Mask 11
AD-OrnamentFrame4 - 60%
AD-OrnamentFrame2 - 60%
tube head in frame4
tube butt in frame2
AD-ChristmasBall1 - 35%
AD-ChristmasBall2 - 35%
AD-ReindeerWithOrnament - 50%
AD-HollyBerries - 50%
Scriptina
When you see ** look at tag to see placement for Elements.
Sometimes it is hard to say just how to place it.
Drop shadows added are 0.0.75.7 unless otherwise stated.
You do not have to add drop shadow...I just do it for effects.
It is always good to check for overhang of shadow on edges of tag.
I have made a tag or to and not check and when I got done
I would post it and see the over hang on the sides and think MAN!! lol
Remember to save often.
Open new Image 600x600.
Copy and paste AD-Paper13 as new layer. Layers, new mask layer
choose the mask from the list click ok Merge group.
Copy and paste AD-OrnamentFrame4 as new layer. Image, free rotate,
15 degrees to left. Move up and to left some.**
Add drop shadow.
Copy and paste AD-OrnamentFrame2 as new layer. Image, free rotate,
15 degrees to right. Move up and to left some.**
Add drop shadow.
Copy and paste tube as new layer. Put behind frame4 and show the head.
Erase any overhang from outside the frame.**
Add drop shadow.
Copy and paste tube as new layer. Put behind frame2 and show the butt.
Erase any overhang from outside the frame.**
Add drop shadow.
Copy and paste AD-ChristmasBall1 as new layer. Image, free rotate,
15 degrees to the left. Place just in center of frames and down
a bit.** Add drop shadow.
Copy and paste AD-ChristmasBall2 as new layer. Image, free rotate,
15 degrees to the right. Place just to left and down from other
Christmasball.** Add drop shadow
Copy and paste AD-ReindeerWithOrnament as new layer. Place at bottom
right of tag.** Add drop shadow.
Copy and paste AD-HollyBerries as new layer. Move to over Ornaments.**
Duplicate and move to beside the ball with the moose.**
Add drop shadow.
Add proper copyright. url and Lic if required
and your name. And were done. On the name Dropshadow used was
2,2, 100, 10 white then again with black.
This tutorial was written by Rebecca Townsley on 12/06/13.
Any similarity to any other tutorial is purely coincidental.
Any creations you make following this tutorial is yours
to do with as you please as long as there is no profit made.
This tutorial is not to be copied or passed around.
I would love to see your results!
If you would like them shown on my blog
Send them to dragonsfairy_25@hotmail.com with
Ornament Crazy in the subject line.
Can't wait to check them out!
Thursday, November 28, 2013

This tut was made using PSPx4
And knowledge of PSPx4.
Supplies needed
Tube of choice. I used one by Keith Garvey.
You need a license to use his work. You can get it
and his work at Garve Girls PSP Tubes.
PTU kit Winter Blush by Tasha's Playground.
Mask of Choice I used the one supplied in the kit.
Font of choice I used Santa's Sleigh.
Go ahead and open list of Things here used and go ahead and resize them
by the percentage by each item. If there is no number no need to resize.
paper7 - 75%
mask from kit
swirl
frame1
berry
branch2
berries2 fh
dry flower
branches
berries
tube - resize to fit
move to over frame
ornament1 - 50%
snowflakes3
When you see ** look at tag to see placement for Elements.
Sometimes it is hard to say just how to place it.
Drop shadows added are 0.0.75.7 unless otherwise stated.
You do not have to add drop shadow...I just do it for effects.
It is always good to check for overhang of shadow on edges of tag.
I have made a tag or to and not check and when I got done
I would post it and see the over hang on the sides and think MAN!! lol
Remember to save often.
Open new Image 600x600.
Copy and paste paper7 as new layer. Layers, new mask layer
choose the mask from the list click ok Merge group.
Copy and paste swirl as new layer.
Copy and paste frame1 as new layer. May have to move
down some.
Copy and paste berry as new layer. Move to left of frame.**
Add drop shadow.
Copy and paste branch2 as new layer. Move to left of frame.
Just to right of berry.** Add drop shadow.
Copy and paste berries2 as new layer. Images Flip Horizontal.
Move to right of frame.** Add drop shadow.
Copy and paste dry flower as new layer. Move to left of frame
just over the berries2.** Add drop shadow
Copy and paste branches as new layer. Move to bottom of frame.**
Add drop shadow.
Copy and paste berries as new layer. Place n center of branches.**
Add drop shadow.
Copy and paste tube as new layer. Place above frame layer.**
Erase any over hang you see from under the bottom of branches.
Add drop shadow.
Copy and paste ornament1 as new layer. Move to the bottom left of tag.**
Add drop shadow.
Add proper copyright. url and Lic if required
and your name. And were done.
This tutorial was written by Rebecca Townsley on 11/28/13.
Any similarity to any other tutorial is purely coincidental.
Any creations you make following this tutorial is yours
to do with as you please as long as there is no profit made.
This tutorial is not to be copied or passed around.
I would love to see your results!
If you would like them shown on my blog
Send them to dragonsfairy_25@hotmail.com with
Winter Blush in the subject line.
Can't wait to check them out!
Tuesday, November 26, 2013

This tut was made using PSPx4
And knowledge of PSPx4.
Supplies needed
Tube of choice. I used one by Steve Baier.
You need a license to use his work. You can get it
and his work at CDO.
PTU kit Ice by Irish Princess Designs.
Mask of Choice I used Mask 50 MB and SW by Moonbeams and Spiderwebs.
Font of choice I used TheNautiGal.
Go ahead and open list of Things here used and go ahead and resize them
by the percentage by each item. If there is no number no need to resize.
IBD_Ice_Paper1
Mask 50 MB and SW
IBD_Ice_Doodle
IBD_Ice_Curls
IBD_Ice_Frame
tube - 85%
IBD_Ice_TiltedTree - 75%
IBD_Ice_Moose - 50%
IBD_Ice_Baubles - 75%
IBD_Ice_Cane1 - 50%
When you see ** look at tag to see placement for Elements.
Sometimes it is hard to say just how to place it.
Drop shadows added are 0.0.75.7 unless otherwise stated.
You do not have to add drop shadow...I just do it for effects.
It is always good to check for overhang of shadow on edges of tag.
I have made a tag or to and not check and when I got done
I would post it and see the over hang on the sides and think MAN!! lol
Remember to save often.
Open new Image 600x600.
Copy and paste IBD_Ice_Paper1 as new layer. Layers, new mask layer
choose the mask from the list click ok Merge group.
Copy and paste IBD_Ice_Doodle as new layer.
Add drop shadow.
Copy and paste IBD_Ice_Curls as new layer. May have to move
down some.
Copy and paste IBD_Ice_Frame as new layer.
Add drop shadow.
Copy and paste Tube as new layer. Move behind frame.
Add drop shadow. Selections all float defloat, on frame layer
erase only the top part of frame over the tube. This makse it
look like the tube is coming out of the frame. Selections none.
Erase any tube overhang from bottom of frame.
Copy and paste IBD_Ice_TiltedTree as new layer. Move to the right
and down a tad.** Add drop shadow.
Copy and paste IBD_Ice_Moose as new layer. Place at bootom
of the tree.** Add drop shadow.
Copy and paste IBD_Ice_Baubles as new layer. Move to the left
of the frame.**Add drop shadow.
Copy and paste IBD_Ice_Cane1 as new layer. Free rotate 90 degrees
to the left.Move to the bottom left of tag.** Add drop shadow.
Add proper copyright. url and Lic if required
and your name. And were done.
This tutorial was written by Rebecca Townsley on 11/26/13.
Any similarity to any other tutorial is purely coincidental.
Any creations you make following this tutorial is yours
to do with as you please as long as there is no profit made.
This tutorial is not to be copied or passed around.
I would love to see your results!
If you would like them shown on my blog
Send them to dragonsfairy_25@hotmail.com with
Christmas Cheer in the subject line.
Can't wait to check them out!
Saturday, November 23, 2013

This tut was made using PSPx4
And knowledge of PSPx4.
Supplies needed
Tube of choice. I used one by Barbara Jensen.
You need a license to use her work. You can get it
and her work at Barbara Jensen Tubes.
PTU kit Fabulous by Tasha's Playground.
Mask of Choice I used MB and SW mask 17 from Moonbeams and Spiderwebs.
Font of choice I used P22 Corinthia.
Go ahead and open list of Things here used and go ahead and resize them
by the percentage by each item. If there is no number no need to resize.
paper12 - 75%
MB and SW Mask 17
bling scatter - 95%
swirl
brick wall 1 - 95%
frame3
tube - 85%
tattoo heart - 85%
sparkles
wordart2 - 65%
When you see ** look at tag to see placement for Elements.
Sometimes it is hard to say just how to place it.
Drop shadows added are 0.0.75.7 unless otherwise stated.
You do not have to add drop shadow...I just do it for effects.
It is always good to check for overhang of shadow on edges of tag.
I have made a tag or to and not check and when I got done
I would post it and see the over hang on the sides and think MAN!! lol
Remember to save often.
Open new Image 600x600.
Copy and paste paper12 as new layer. Layers, new mask layer
choose the mask from the list click ok Merge group.
Copy and paste bling scatter as new layer.
Add drop shadow.
Copy and paste swirl as new layer. Move to left and up a bit.**
Add drop shadow.
Copy and paste brick wall 1 as new layer.
Copy and paste frame3 as new layer.
Add drop shadow.
Copy and paste tube as new layer. Move to the right a bit.
Add drop shadow.
Copy and paste tattoo heart as new layer. Move to over the arms of tube.**
Add drop shadow.
Copy and paste sparkles as new layer. Move to top left. Duplicate,
Image flip horizontal, flip vertical, Move to bottom right. Merge
sparkle layers.**
Copy and paste wordart2 as new layer. Move to over the tattoo heart.**
Add drop shadow of 2,2,100,8.
Add proper copyright. url and Lic if required
and your name. And were done.
This tutorial was written by Rebecca Townsley on 11/23/13.
Any similarity to any other tutorial is purely coincidental.
Any creations you make following this tutorial is yours
to do with as you please as long as there is no profit made.
This tutorial is not to be copied or passed around.
I would love to see your results!
If you would like them shown on my blog
Send them to dragonsfairy_25@hotmail.com with
Bitch Please in the subject line.
Can't wait to check them out!
Friday, November 15, 2013

This tut was made using PSPx4
And knowledge of PSPx4.
Supplies needed
Tube of choice. One with a close up. I used one by Elias Chatzoudis.
You need a license to use his work. You can get it
and his work at Elias Art Shop.
PTU kit Harvest Moon by Honored Scraps.
You can get it at Mystical Scraps.
Mask of Choice I used Mask 44 MB and SW by Moonbeams and Spiderwebs.
Font of choice I used Riesling.
Go ahead and open list of Things here used and go ahead and resize them
by the percentage by each item. If there is no number no need to resize.
Paper_07 - 75%
Mask 44 MB and SW
Element_23
Element_16
Tube close up
Tube
Element_15
Element_46 - 75%
Element_03 - 75%
When you see ** look at tag to see placement for Elements.
Sometimes it is hard to say just how to place it.
Drop shadows added are 0.0.75.7 unless otherwise stated.
You do not have to add drop shadow...I just do it for effects.
It is always good to check for overhang of shadow on edges of tag.
I have made a tag or to and not check and when I got done
I would post it and see the over hang on the sides and think MAN!! lol
Remember to save often.
Open new Image 600x600.
Copy and paste Paper_07 as new layer. Layers, new mask layer
choose the mask from the list click ok Merge group.
Copy and paste Element_23 as new layer.
Add drop shadow.
Copy and paste Element_16 as new layer. Move to top right of
of frame.** Add drop shadow.
Copy and paste tube close up as new layer. Move to behind left
part of frame.** Erase any overhang you see around the edges.
Copy and paste Tube as new layer. Move to right of frame.**
Add drop shadow.
Copy and paste Element_15 as new layer. Put in center of frame.**
Add drop shadow.
Copy and paste Element_46 as new layer. Move to left of frame.**
Add drop shadow
Copy and paste Element_03 as new layer. Move down and to left a bit.**
Add drop shadow.
Add proper copyright. url and Lic if required
and your name. And were done.
This tutorial was written by Rebecca Townsley on 11/15/13.
Any similarity to any other tutorial is purely coincidental.
Any creations you make following this tutorial is yours
to do with as you please as long as there is no profit made.
This tutorial is not to be copied or passed around.
I would love to see your results!
If you would like them shown on my blog
Send them to dragonsfairy_25@hotmail.com with
PTU Autumn Time in the subject line.
Can't wait to check them out!
Wednesday, November 6, 2013

This tut was made using PSPx4
And knowledge of PSPx4.
Supplies needed
Tube of choice. I used Pris by Eos Sparks.
You need a license to use her work. You can get it
and her work at The Psp Project.
PTU kit Revamped *The Raven* by Scrappin Krazy Designs.
Mask of Choice I used Mask 50 MB and SW by Moonbeams and Spiderwebs.
Font of choice I used Typewriter Oldstyle.
Go ahead and open list of Things here used and go ahead and resize them
by the percentage by each item. If there is no number no need to resize.
p01
Mask 50 MB and SW
ele12
p07 - 75%
p13 - 75%
p04 - 75%
ele59 - 85%
ele25 - 95%
ele07
ele40
ele19 - 65%
ele43 - 75%
ele22
When you see ** look at tag to see placement for Elements.
Sometimes it is hard to say just how to place it.
Drop shadows added are 0.0.75.7 unless otherwise stated.
You do not have to add drop shadow...I just do it for effects.
It is always good to check for overhang of shadow on edges of tag.
I have made a tag or to and not check and when I got done
I would post it and see the over hang on the sides and think MAN!! lol
Remember to save often.
Open new Image 600x600.
Copy and paste p01 as new layer. Layers, new mask layer
choose the mask from the list click ok Merge group.
Copy and paste ele12 as new layer.
Add drop shadow settings 0,2,100,9.
Copy and paste p07 as new layer. Move to under frame layer.
Using magic wand Click inside the top part of the frame, selections,
modify, expand by 10, invert, on the paper layer delete, selections none.
Repeat same with p13 , middle frame and p04 and top frame.
Copy and paste tube as new layer. Move to under frame layer just
tha paper for top frame. Place what part you want showing in the
frame and erase what is showing on outside of frame. Repeat for
middle frame.
Copy and paste Tube as new layer. Move to above frame layer.
Add drop shadow. Selections all, float, defloat. On frame layer erase
part of frame that is over top and middle part of tube. Erase bottom
of tube. This will make it look like she is standing out of the frame.
Copy and paste ele59 as new layer. Move to bottom right of tag.**
Copy and paste ele25 as new layer. Move to left of tag.**
Add drop shadow
Copy and paste ele27 as new layer. Move to upper right of tag,
and make first layer.**
Copy and paste ele40 as new layer. Make top layer and move to top
of tag.** Add drop shadow.
Copy and paste ele19 as new layer. Move to bottom left of tag.**
Add drop shadow.
Copy and paste ele43 as new layer. Using pick tool rotate a bit to
the right, move to above frame layer and just to top of the middle
frame.** Add drop shadow.
Copy and paste ele22 as new layer. Move to top duplicate move to middle
duplicate and move that one to bottom.
Add proper copyright. url and Lic if required
and your name. And were done.
This tutorial was written by Rebecca Townsley on //13.
Any similarity to any other tutorial is purely coincidental.
Any creations you make following this tutorial is yours
to do with as you please as long as there is no profit made.
This tutorial is not to be copied or passed around.
I would love to see your results!
If you would like them shown on my blog
Send them to dragonsfairy_25@hotmail.com with
Raven in the subject line.
Can't wait to check them out!
Saturday, November 2, 2013

I know Halloween is over so I tried to make this look
more Gothic using a Halloween kit!
This tut was made using PSPx4
And knowledge of PSPx4.
Supplies needed
Tube of choice. I used one by Susan Justice.
You need a license to use her work. You can get it
and her work at *Coming Soon*
PTU kit Wytchs Night by Scrappin Krazy Designs.
Mask of Choice I used Mask Creative misfits week 5 grunge masks.
grungemask2byjenny. You can get it Here.
Font of choice I used Trinigan FG.
Go ahead and open list of Things here used and go ahead and resize them
by the percentage by each item. If there is no number no need to resize.
p13 - 75%
Mask Creative misfits week 5
grunge masks - grungemask2byjenny
tube - 85%
ele48
ele52 - 50%
ele03 - 75%
ele43 - 50%
ele20 - 75%
When you see ** look at tag to see placement for Elements.
Sometimes it is hard to say just how to place it.
Drop shadows added are 0.0.75.7 unless otherwise stated.
You do not have to add drop shadow...I just do it for effects.
It is always good to check for overhang of shadow on edges of tag.
I have made a tag or to and not check and when I got done
I would post it and see the over hang on the sides and think MAN!! lol
Remember to save often.
Open new Image 600x600.
Copy and paste p13 as new layer. Layers, new mask layer
choose the mask from the list click ok Merge group.
Copy and paste tube as new layer. Move slightly to the left.**
Add drop shadow of 2,2,100,7.
Copy and paste ele48 as new layer.
Add drop shadow.
Copy and paste ele52 as new layer. Move to upper right.**
Add drop shadow.
Copy and paste ele03 as new layer. Move him to the right a bit.**
Add drop shadow.
Copy and paste ele43 as new layer. Move to bottom right of the reaper.**
Add drop shadow.
Copy and paste ele20 as new layer. Move to
bottom of tag.** Add drop shadow.
Add proper copyright. url and Lic if required
and your name. And were done.
This tutorial was written by Rebecca Townsley on 11/02/13.
Any similarity to any other tutorial is purely coincidental.
Any creations you make following this tutorial is yours
to do with as you please as long as there is no profit made.
This tutorial is not to be copied or passed around.
I would love to see your results!
If you would like them shown on my blog
Send them to dragonsfairy_25@hotmail.com with
PTU Wytchs Night in the subject line.
Can't wait to check them out!

These were made using Irish Princess Designs kit *Fall Fantasy*
You can get details on where to get the kit
by clicking on its name above.
The rest of the snags are below.
Enjoy!


Wednesday, September 25, 2013

This tut was made using PSPx4
And knowledge of PSPx4.
Supplies needed
Tube of choice. I used one by Ching-Chou Kuik.
You need a license to use her work. You can get it
and her work at *Coming Soon*
PTU kit Happy Autumn by Tasha's Playground.
Mask of Choice I used Mask 44 MB and SW from
Font of choice I used Script MT Bold.
Go ahead and open list of Things here used and go ahead and resize them
by the percentage by each item. If there is no number no need to resize.
paper2
Mask 44 MB and SW
frame3
tube
leaves2
umbrella - 85% fr 45 to r
branch3 fl H
boots 50%
branch1
When you see ** look at tag to see placement for Elements.
Sometimes it is hard to say just how to place it.
Drop shadows added are 0.0.75.7 unless otherwise stated.
You do not have to add drop shadow...I just do it for effects.
It is always good to check for overhang of shadow on edges of tag.
I have made a tag or to and not check and when I got done
I would post it and see the over hang on the sides and think MAN!! lol
Remember to save often.
Open new Image 700x700.
Copy and paste paper2 as new layer. Layers, new mask layer
choose the mask from the list click ok Merge group.
Copy and paste frame3 as new layer.
Add drop shadow.
Copy and paste tube as new layer. Place behind frame and erase
any overhang. Add drop shadow.
Copy and paste leaves2 as new layer. Move to bottom of frame.**
Add drop shadow.
Copy and paste umbrella as new layer. Move to bottom right of
frame.** Image - Free roate 45 to the right. Add drop shadow.
Copy and paste branch3 as new layer. Move to top of frame.**
Add drop shadow.
Copy and paste boots as new layer. Move to bottom right of tag.**
Add drop shadow.
Copy and paste branch1 as new layer. Move to left of frame.**
Add drop shadow.
Add proper copyright. url and Lic if required
and your name. And were done.
This tutorial was written by Rebecca Townsley on 9/25/13.
Any similarity to any other tutorial is purely coincidental.
Any creations you make following this tutorial is yours
to do with as you please as long as there is no profit made.
This tutorial is not to be copied or passed around.
I would love to see your results!
If you would like them shown on my blog
Send them to dragonsfairy_25@hotmail.com with
PTU Happy Autumn in the subject line.
Can't wait to check them out!
Tuesday, September 24, 2013

This tut was made using PSPx4
And knowledge of PSPx4.
Supplies needed
Tube of choice. I used one by Elias Chatzoudis.
You need a license to use his work. You can get it
and his work at Elias Art Shop.
PTU kit Scary Cool by Gimptastic Scraps.
You can get it at The PSP Project.
Mask of Choice I used 570 Insatiable Dreams Mask and 530 Insatiable Dreams.
You can get 230 Here.
You can get 270 Here.
Font of choice I used Words - Saginaw.
Font of choice I used name - Alix2.
If you Choose to add the words Will need EyeCandy 4000
Gradient Glow
Go ahead and open list of Things here used and go ahead and resize them
by the percentage by each item. If there is no number no need to resize.
Paper1
570 Insatiable Dreams Mask
Paper5
530 Insatiable Dreams Mask
Frame6
Wire
Tube
Belt
Flowers1
SkullHeart - 80%
Heels - 75%
When you see ** look at tag to see placement for Elements.
Sometimes it is hard to say just how to place it.
Drop shadows added are 0.0.75.7 unless otherwise stated.
You do not have to add drop shadow...I just do it for effects.
It is always good to check for overhang of shadow on edges of tag.
I have made a tag or to and not check and when I got done
I would post it and see the over hang on the sides and think MAN!! lol
Remember to save often.
Open new Image 700x700.
Copy and paste Paper1 as new layer. Layers, new mask layer
choose the mask from the list click ok Merge group.
Copy and paste Paper5 as new layer. Layers, new mask layer
choose the mask from the list click ok Merge group.
Copy and paste Frame6 as new layer.
Add drop shadow.
Copy and paste Wire as new layer. Move to top of frame.** Duplicate
Move to Bottom of frame.** Duplicate Image free rotate 90 to the right.
Move to right of frame.** Duplicate Move to left of frame.** Erase any
hangover from the wires on the sides. Merge the wires together.
Add drop shadow.
Copy and paste tube as new layer. Duplicate Blend mode Hardlight.
Merge down. Add drop shadow. Move slightly to the right.**
Copy and paste Belt as new layer. Move to bottom of frame.**
Add drop shadow.
Copy and paste FLowers1 as new layer. Move to the left of frame.**
Add drop shadow.
Copy and paste SkullHeart as new layer. Move to the top right.**
Add drop shadow
Copy and paste Heels as new layer. Move to bottom right.**
Add drop shadow.
Resize all using Pixels by 600x600
For words if you choose to add them, you will need EyeCandy 4000
Gradient Glow settings 4,25,100 Color white Drop shadow 2, 2, 6, 100.
Add proper copyright. url and Lic if required
and your name. And were done.
This tutorial was written by Rebecca Townsley on 9/25/13.
Any similarity to any other tutorial is purely coincidental.
Any creations you make following this tutorial is yours
to do with as you please as long as there is no profit made.
This tutorial is not to be copied or passed around.
I would love to see your results!
If you would like them shown on my blog
Send them to dragonsfairy_25@hotmail.com with
PTU Love and Ghosts in the subject line.
Can't wait to check them out!
Saturday, September 14, 2013

This tut was made using PSPx4
And knowledge of PSPx4.
Supplies needed
Tube of choice. I used one by Lori Karels.
You need a license to use her work. You can get it
and her work at The PSP Project.
PTU kit Blue Love by Kittie's Sinful Designs.
You can get it at Mystical Scraps.
Mask of Choice I used Mask 52 MB and SW from Moonbeams and Spiderwebs.
You can get it Here.
Font of choice I used Porcelain.
Go ahead and open list of Things here used and go ahead and resize them
by the percentage by each item. If there is no number no need to resize.
paper 8 - 75%
mask 52 MB and SW
42
59
99
88
tube - 75%
97 = 40%
When you see ** look at tag to see placement for Elements.
Sometimes it is hard to say just how to place it.
Drop shadows added are 0.0.75.7 unless otherwise stated.
You do not have to add drop shadow...I just do it for effects.
It is always good to check for overhang of shadow on edges of tag.
I have made a tag or to and not check and when I got done
I would post it and see the over hang on the sides and think MAN!! lol
Remember to save often.
Open new Image 600x600.
Copy and paste paper 8 as new layer. Layers, new mask layer
choose the mask from the list click ok Merge group. .Duplicate
Image flip Horizontal
Copy and paste 42 as new layer. Move to botom Layer.
Add drop shadow.
Copy and paste 59 as new layer.
Add drop Shadow.
Copy and paste 99 as new layer. Move to bottom of frame.**
Add drop Shadow.
Copy and paste 88 as new layer. Move to bottom of frame.**
Add drop Shadow.
Copy and paste tube as new layer. Move behind Frame, Using
eraser tool I erase part sticking out from top and bottom.
Leaving the hair sticking out on the side there.**
Add drop shadow.
Copy and paste 97 as new layer. Move to top left of tag. Useing
Pick tool rotate to left a bit.**
Add drop shadow
Add proper copyright. url and Lic if required
and your name. And were done.
This tutorial was written by Rebecca Townsley on 9/15/13.
Any similarity to any other tutorial is purely coincidental.
Any creations you make following this tutorial is yours
to do with as you please as long as there is no profit made.
This tutorial is not to be copied or passed around.
I would love to see your results!
If you would like them shown on my blog
Send them to dragonsfairy_25@hotmail.com with
PTU Blue Love in the subject line.
Can't wait to check them out!
Subscribe to:
Posts
(Atom)