Thursday, February 28, 2013

This tut was made using PSPx5
And knowledge of PSPx5.
Supplies needed
Tube of choice. I used Carlos Diez.
You need a license to use his work. You can get it
and his work at *Coming Soon*
FTU kit Manto by Tasha's Playground.
Font of choice I used Trinagin FG.
Go ahead and open list of Things here used and go ahead and resize them
by the percentage by each item. If there is no number no need to resize.
tube - 90%
frame4 - 90%
paper7 - 75%
gravestone - 75%
deco
wheels
ribbon - 90%
When you see ** look at tag to see placement for Elements.
Sometimes it is hard to say just how to place it.
Drop shadows added are 0.0.75.7 unless otherwise stated.
It is always good to check for overhang of shadow on edges of tag.
I have made a tag or to and not check and when I got done
I would post it and see the over hang on the sides and think MAN!! lol
Remember to save often.
Open new Image 600x600.
Copy and paste frame 4 as new layer.
Using magic wand click inside frame, selections,
modify,expand by 2, invert.
Copy and paste paper7 as new layer. Move to
under frame, delete, seletions none.
Copy and paste gravestone as new layer.
Move to bottom right of frame.**
Add drop shadow to it and frame.
Copy and paste tube as new layer. Place to left
of frame.** Add drop shadow. On Frame Selections,
all, float, defloat. Erase part of tube at bottom
of framde to look like she is standing in it.
Selections none. Erase over hang from tube at
bottom of frame.
Copy and paste deco as new layer. Move to upper left
of tag.** Duplicate, Images, flip horizontal, flip Vertical.
Move Duplicate to bottom right of tag.** Merge down,
Change opasity to 60. Move to bottom layer.
Copy and paste wheels as new layer. Move to above deco layer.
Add drop shadow.
Copy and paste ribbon as new layer. Move to bottom of tag.
And make top layer.** Add drop shadow.
Add proper copyright. url and Lic if required.
Add name Drop shadow 2.2.100.7 and were done.
This tutorial was written by Rebecca Townsley on 3/1/13.
Any similarity to any other tutorial is purely coincidental.
Any creations you make following this tutorial is yours
to do with as you please as long as there is no profit made.
This tutorial is not to be copied or passed around.
I would love to see your results!
If you would like them shown on my blog
Send them to dragonsfairy_25@hotmail.com with
PTU Skulss and Senoritas in the subject line
Can't wait to check them out!
This tut was made using PSPx5
And knowledge of PSPx5.
Supplies needed
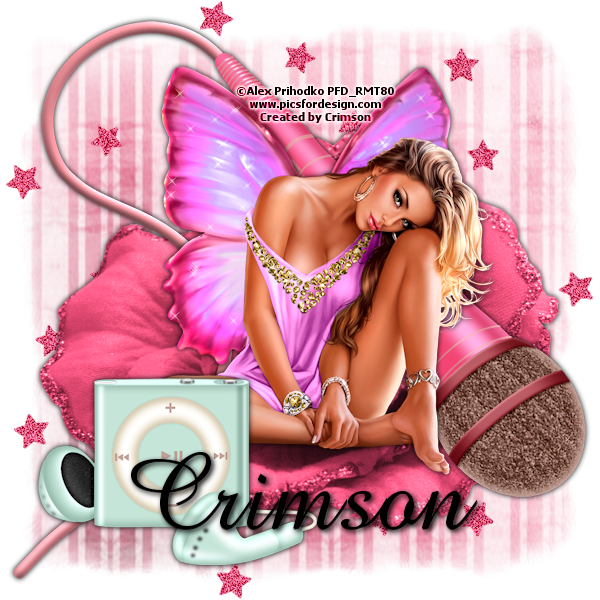
Tube of choice. I used Alex Prihodko.
You need a license to use his work. You can get it
and his work at Pics For Design.
PTU kit Hard Rock Princess by Irish Princess Designs.
Mask 300InsatiableDreams from Insatiable Dreams.
Font of choice I used Amazone BT.
Go ahead and open list of Things here used and go ahead and resize them
by the percentage by each item. If there is no number no need to resize.
tube - 30%
300InsatiableDreams
IBD_HRP_Rose
IBD_HRP_Swirl
IBD_HRP_iPod - 50%
IBD_HRP_Microphone
IBD_HRP_Paper5
When you see ** look at tag to see placement for Elements.
Sometimes it is hard to say just how to place it.
Drop shadows added are 0.0.75.7 unless otherwise stated.
It is always good to check for overhang of shadow on edges of tag.
I have made a tag or to and not check and when I got done
I would post it and see the over hang on the sides and think MAN!! lol
Remember to save often.
Open new Image 600x600.
Copy and paste IBD_HRP_Rose as new layer.
Move up just a tad.** Add drop shadow.
Copy and paste tube as new layer. Move up to over the rose
to look like she is sitting on it.**
Copy and paste IBD_HRP_Swirl as new layer.
Move to bottom layer.
Copy and paste IBD_HRP_iPod as new layer.
Move to bottom left of tag.**
Add Drop Shadow.
Copy and paste IBD_HRP_Microphone as new layer.
Move to above flower layer.** Add drop shadow.
Copy and paste IBD_HRP_Paper5 as new layer.
Move to bottom layer.
Layers, New mask layer, from image.
Choose the mask in the list. Click ok, Merge groups.
Add proper copyright. url and Lic if required.
Add name Drop shadow and were done.
This tutorial was written by Rebecca Townsley on 2/28/13.
Any similarity to any other tutorial is purely coincidental.
Any creations you make following this tutorial is yours
to do with as you please as long as there is no profit made.
This tutorial is not to be copied or passed around.
I would love to see your results!
If you would like them shown on my blog
Send them to dragonsfairy_25@hotmail.com with
PTU Music Fae in the subject line
Can't wait to check them out!

This tut was made using PSPx5
And knowledge of PSPx5.
Supplies needed
Tube of choice. I used Barbara Jensen.
You need a license to use her work. You can get it
and her work at her store HERE.
PTU kit Rockabilly Wedding by Scrappin Krazy Designs.
Mask MB and SW Mask 39 from Moonbeams and Spiderwebs.
Font of choice I used AdineKirnberg.
Go ahead and open list of Things here used and go ahead and resize them
by the percentage by each item. If there is no number no need to resize.
Tube - 80%
MB and SW Mask 39
ele24 - 90%
ele37 - 90%
ele56 - 50%
ele59 - 50%
ele61
ele25
ele09 - 50%
p18 - 75%
p09
When you see ** look at tag to see placement for Elements.
Sometimes it is hard to say just how to place it.
Drop shadows added are 0.0.75.7 unless otherwise stated.
It is always good to check for overhang of shadow on edges of tag.
I have made a tag or to and not check and when I got done
I would post it and see the over hang on the sides and think MAN!! lol
Remember to save often.
Open new Image 600x600.
Copy and paste ele24 as new layer
Using magic wand click inside each
square of frame. Selections, expand by 2
invert On paper delete selections none
Copy and paste tube as new layer.
Move to left of tag.
Copy and paste ele37 as new layer.
Move to bottom left of frame.
Just over tube.** Add drop shadow.
Copy and paste Close up of tube as
new layer. Image Flip Horizontal.
Place under the frame and to the right.**
On the Paper layer Selections all, float,
defloat, invert. On the close up of tube
delete, selections none. Blend mode Hardlight
On frame, add drop shadow.
Copy and paste ele56 as new layer. Place to the left
and bottom of frame over the flowers.** Add drop shadow.
Copy and paste ele59 as new layer. Place just to right
of the heart** Add drop shadow.
Copy and paste ele61 as new layer. Image, free rotate,
90 degrees to the right, Image, flip horizontal.
Move to upper right hand corner of frame.**
Add drop shadow.
Copy and paste ele25 as new layer.
Move to bottom layer.
Copy and paste ele09 as new layer.
Move to top right of frame.**
Copy and paste p09 as new layer. Move to very bottom layer.
Layers, New mask layer, from image, find the mask in the list
click ok. Merge group.
Add proper copyright. url and Lic if required.
Add name Inner Bevel, Bevel 2, width 1
Smoothness 50, Depth 11, Ambience -4, Shineness 71
color (same you used for font), Angle 0, Intensity 28,
Elevations 42. Add drop shadow settings 2.2.100.6 Color white.
This tutorial was written by Rebecca Townsley on 2/28/13.
Any similarity to any other tutorial is purely coincidental.
Any creations you make following this tutorial is yours
to do with as you please as long as there is no profit made.
This tutorial is not to be copied or passed around.
I would love to see your results!
If you would like them shown on my blog
Send them to dragonsfairy_25@hotmail.com with
PTU Passions in the subject line
Can't wait to check them out!
Thursday, February 14, 2013

This tut was made using PSPx5
And knowledge of PSPx5.
Supplies needed
Tube of choice. I used Henning Ludvigsen.
You need a license to use his work. You can get it
and his work here at The PSP Project.
PTU kit This Love by Rabid Designs.
Mask StaciMisfitAutumnFallMask1 from Creative Misfits Blog.
Font of choice I used Times New Romance.
Go ahead and open list of Things here used and go ahead and resize them
by the percentage by each item. If there is no number no need to resize.
Tube
Mask
frame1 - 85%
ele8
ele9 - 50%
ele45 - 50%
ele50 - 75%
Paper11 - 75%
Paper4
When you see ** look at tag to see placement for Elements.
Sometimes it is hard to say just how to place it.
Drop shadows added are 0.0.100.4 unless otherwise stated.
It is always good to check for overhang of shadow on edges of tag.
I have made a tag or to and not check and when I got done
I would post it and see the over hang on the sides and think MAN!! lol
Remember to save often.
Open new Image 600x600.
Copy and paste frame1 as new layer. Image free rotate,
to the right by 45 degrees all layers NOT checked.
Using Magic Wand Click inside each part of frame.
Selections, expand by 15, invert.
Copy and paste Paper11 as new layer.
Delete Selections none.
Copy and paste tube as new layer. Using pick tool
rotate to the left.** Add drop shadow. On Frame Selections
all, float, defloat, on tube erase part at bottom of frame.**
Add drop shadow to frame.
Copy and paste ele8 as new layer. Move to bottom layer.
Add drop shadow.
Copy and paste as new layer. Move to bottom left
of tag.** Add drop shadow.
Copy and paste ele45 as new layer. Move to bottom right.
and under the roses.** Add drop shadow.
Copy and paste Paper4 as new layer. Layers, new mask layer,
from image, find name in list click ok. Merge group.
Add proper copyright. url and Lic if required.
Add name Inner Bevel, Bevel 2, width 8
Smoothness 0, Depth 12, Ambience 0, Shineness 0
color white, Angle 315, Intensity 30, Elevations 60
Add drop shadow and your done.
This tutorial was written by Rebecca Townsley on 2/14/13.
Any similarity to any other tutorial is purely coincidental.
Any creations you make following this tutorial is yours
to do with as you please as long as there is no profit made.
This tutorial is not to be copied or passed around.
I would love to see your results!
If you would like them shown on my blog
Send them to dragonsfairy_25@hotmail.com with
PTU Pink Love in the subject line
Can't wait to check them out!
Wednesday, February 13, 2013

This tut was made using PSPx5
And knowledge of PSPx5.
Supplies needed
Tube of choice. I used Kiwi Fire Storm's Chantelle.
You need a license to use his work. You can get it
and his work here at The PSP Project.
PTU kit Marry The Night by Killer Kitty.
Which is not Available for at least a Couple of weeks.
Will add here when it is Available.
Font of choice I used Allegro.
EyeCandy 4000 Gradiant Glow
Go ahead and open list of Things here used and go ahead and resize them
by the percentage by each item. If there is no number no need to resize.
Tube - 70%
K4-MarryTheNight-Frame02
K4-MarryTheNight-CityScape01
K4-MarryTheNight-Charm02 - 75%
K4-MarryTheNight-Diamonds
K4-MarryTheNight-GlitterDoodle
K4-MarryTheNight-JeweledFlower - 75%
K4-MarryTheNight-Mask01 - 30%
K4-MarryTheNight-Hearts
K4-MarryTheNight-Sparkles - 96%
K4-MarryTheNight-Paper05 - 67%
When you see ** look at tag to see placement for Elements.
Sometimes it is hard to say just how to place it.
Drop shadows added are 0.0.100.4 unless otherwise stated.
It is always good to check for overhang of shadow on edges of tag.
I have made a tag or to and not check and when I got done
I would post it and see the over hang on the sides and think MAN!! lol
Remember to save often.
Open new Image 600x600.
Copy and paste K4-MarryTheNight-Frame02 as new layer.
Using Magic Wand Click inside the frame. Even in the outside corners.
Selections, Modify, Expand by 2, Invert.
Copy and paste K4-MarryTheNight-Paper05 as new layer.
Delete Move to bottom layer, selections none.
Add drop shadow to Frame.
Copy and paste tube as new layer.
Add drop shadow.
Copy and paste K4-MarryTheNight-CityScape01 as new layer.
Move to under frame and down a bit. Erase the sides that hang
out from frame.**
Copy and paste K4-MarryTheNight-Charm02 as new layer.
Move to upper right corner of frame and place under tube layer.**
Add drop Shadow.
Copy and paste K4-MarryTheNight-Diamonds as new layer.
Move to very bottom layer.**
Copy and paste K4-MarryTheNight-GlitterDoodle as new layer.
Move to under paper layer, up and to left a bit.**
add drop shadow.
Copy and paste K4-MarryTheNight-JeweledFlower as new layer.
Move to bottom right of tag.**
Add drop shadow.
Copy and paste K4-MarryTheNight-Mask01 as new layer.
Using Pick tool rotate a bit to the left.
Move to Upper left corner.**
Add drop shadow.
Copy and paste K4-MarryTheNight-Hearts as new layer.
Move to above frame layer and to the left a bit.**
Add drop shadow.
Copy and paste K4-MarryTheNight-Sparkles as new layer.
Add proper copyright. url and Lic if required.
Add name. For name you will use color from tube and
for stroke 1.0 color black. Use EyeCandy Gradiant Glow.
Color white width 8 soft 25 overall 100 draw on outside checked.
Add drop shadow of 2, 2, 100, 5. And your done.
This tutorial was written by Rebecca Townsley on 2/14/13.
Any similarity to any other tutorial is purely coincidental.
Any creations you make following this tutorial is yours
to do with as you please as long as there is no profit made.
This tutorial is not to be copied or passed around.
I would love to see your results!
If you would like them shown on my blog
Send them to dragonsfairy_25@hotmail.com with
PTU Marry the Night in the subject line
Can't wait to check them out!
Subscribe to:
Comments
(Atom)